
Educational Articles
Top 10 Saw-Cut Loop Tips & Tricks

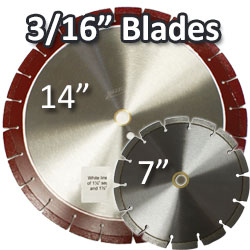
#1. Use a 3/16″ Saw Blade
Prevent detector lock and phantom detections with the right size blade.
It is amazing how just one small aspect of a saw-cut installation, such as blade width can be so crucial for the life of the loop you are installing. Many installers and wire suppliers recommend the use of a 1/8″ saw blade for saw-cutting in loops. It is easy to understand why, 1/8″ diamond blades are inexpensive, make a narrow cut, and are easy to find in stores, but 1/8″ blades cause a lot of issues that installers cannot easily see and the benefits are not worth the consequences.
Some Quick Stats on 1/8″ Grooves:
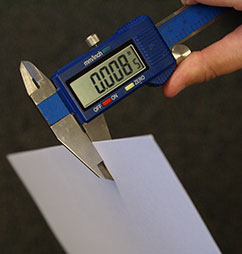
– A saw-cut groove cut with an 1/8″ blade is .125″ wide.
– The outer diameter on a 20AWG XLPE wire commonly used in this industry is .118″
– The average width of a piece of copy paper is .004″
.125 – .118 = .007
Air pockets form when there isn’t enough space for sealant to fully encapsulate the wire.
Because the wires are not encapsulated they are able to move slightly in the groove, this can cause false detections and detector lock up.
Water also finds it way into air pockets, if TFFN or THHN wire is used the water can saturate the wires and cause intermittent loop problems.
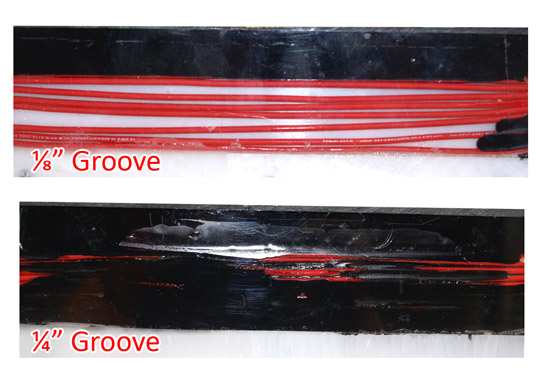
If you wrap wire in a 1/8″ saw-cut groove the clearance around the top wire wrap will be less than the thickness of 2 pieces of copy paper. This is far too narrow for sealant to flow and encapsulate the wires below the top winding. Because the clearance is too narrow for sealant to flow air pockets will form.
In colder climates water in the groove will freeze and expand during winter and slowly push the wire out the groove. The best way to prevent air pockets is to use a 3/16″ or wider blade for your saw-cut loops.
Click here to read more about the importance of blade width.
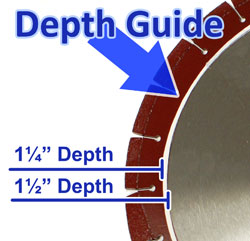
#2. Make a Saw Blade Depth Mark
Cutting at the proper depth will save sealant and extend blade life.
By cutting at the correct depth, less sealant is needed to fill the groove. By simply reducing the blade depth from 2 1/2″ to 1 1/4″, installers can save over 50% in sealant. Not only does cutting at the proper depth save in sealant costs, but the life of the blade is extended. Reducing the depth of the groove, reduces the wear on the blade and allows for faster cutting.
Sealing the groove will take less time with the correct groove depth. Time, money and blade life are just three aspects where you save by cutting at the correct depth.
Every 14″ blade at BD Loops comes with the marked blade depth of both 1 1/4″ and 1 1/2″.
#3. Use a Sealant Tip
Simply using a sealant tip is one of the easiest ways to save time on installations, are you using the correct kind?
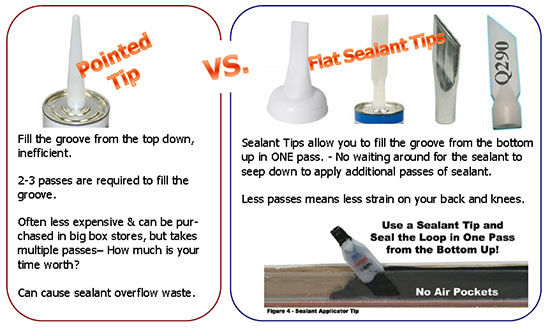
Using a 3/16″ flat sealant tip to seal the loop in 1 pass from the bottom up is one of the best ways to save a significant amount of time when installing loops. No more waiting around to do 2-3 passes to fully seal loops, and less strain on your back and knees. Sealant Brands like Chemque’s QSEAL 209S offer a 3/16″ flat disposable sealant tip.
Sealants with pointed tip applicators will often be a few dollars less expensive than sealant that can be used with a flat sealant tip, but will require more passes to seal the loop. How much is your time worth?
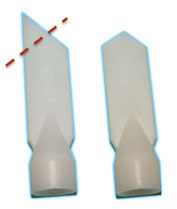
#4. Modified Sealant Tip
Apply sealant more evenly with this simple trick.
One simple cut of the sealant tip can make application simpler and smoother. The modified tip causes the sealant to flow smoothly into the groove while preventing the sealant from bubbling over the groove. The modified tip fills the groove in one pass, from the bottom up. Not only does the modified tip make application easier, but it also creates a more visually attractive cleaner seal while cutting down on waste.
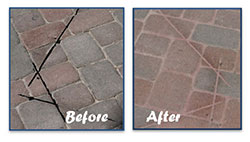
#5. Sand Trick
Mask the saw-cut groove and open the lane faster with this simple trick!
This simple trick will set you apart from the competition. Create a more aesthetically appealing installation and make a happy customer in four easy steps.
Click here to check out a step by step guide on the Sand Trick.
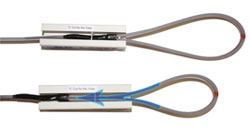
#6. How to Make a BD Loops Preformed Saw-Cut Loop Fit Every Time
Hesitant about installing a preformed saw-cut loop? Don’t worry, it is easier than you think!
Installing a preformed saw-cut loop can be a little intimidating if you’ve never done it before. Installers will often think that you have to cut a perfect sized pattern to make a preformed loop fit.
This may be true with some other brands of preformed loops, but not with BD Loops. As long as you don’t cut the pattern too large our loops will fit 100% of the time.
This quick trick simplifies saw-cut loop installation.
#7. Rolling Work Seat
Applying loop sealant has never been easier!
The benefit of a rolling work seat is obvious, nobody enjoys hunching over and sealing saw-cut loops at the end of the day.
Save your back and knees the pain of bending over. Simply roll along the perimeter of the groove and seal it while in the seat. These handy rolling work seats can be purchased at stores like Harbor Freight.

#8. Sight Sticks
Skip chalking the cutting pattern with this simple trick.
Sight sticks can be used by experienced saw cutters. Simply mark the four corners of the loop with the metal sight sticks which are used as targets to guide the saw-cutting machine. Go straight from laying out the loop to cutting with these tools.
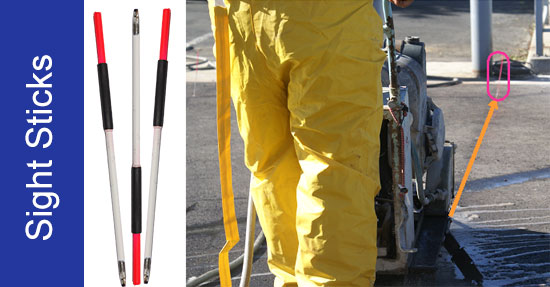
Sight sticks can be made with wooden skewers, we recommend spray painting them to help them stand out. White and florescent spray paint stands out well against asphalt, and black and florescent paint stands out well against concrete.
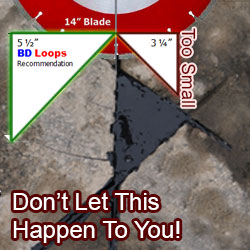
#9. Dog-Ear Corner Size
Maintain a constant depth and prevent corner pieces from popping out.
Are you using the proper size dog ear-corner when cutting your 45° cuts? To maintain a constant cutting depth we recommend a 5 1/2″ x 5 1/2″ x 7 3/4″ dog ear corner pattern. This size pattern is large enough to maintain a constant depth with blades up to 26″ in diameter.
Cutting the corners too small can lead to the corner piece popping out, which creates an ugly mess that takes a lot of expensive loop sealant to fill.

#10. Use an Air Wand to Clean and Dry the Saw-Cut Groove
If you keep compressed air on your truck this is the quickest way to clean and dry a saw-cut groove.
An air wand with a sealant tip fits nicely into saw-cut grooves and quickly blows out debris while drying the groove. Sealant manufacturers generally recommend applying sealant in a dry groove, rather than a wet one. Thoroughly drying the groove before applying sealant prevents bubbles from forming in the sealant and other issues.
Save time, clean and dry the groove faster with an air wand.
BD Loops
The Loop Experts!
BD Loops was founded in 2001. Their preformed loops and accessories are designed with the installer in mind. BD Loops offers a complete loop system solution including preformed direct burial loops, preformed saw-cut loops, loop sealant, blades, testing devices, and installation tools. BD Loops has a reputation for reliability and ease of installation. They pride themselves on the quality of their products and their commitment to providing excellent customer service and support. BD Loops preformed loops are made in the USA at their facility in Placentia, CA.